Curtain Math: The Rod Height, Fullness Ratio, and Return Depth That Make or Break a Room

Curtain Math: The Rod Height, Fullness Ratio, and Return Depth That Make or Break a Room
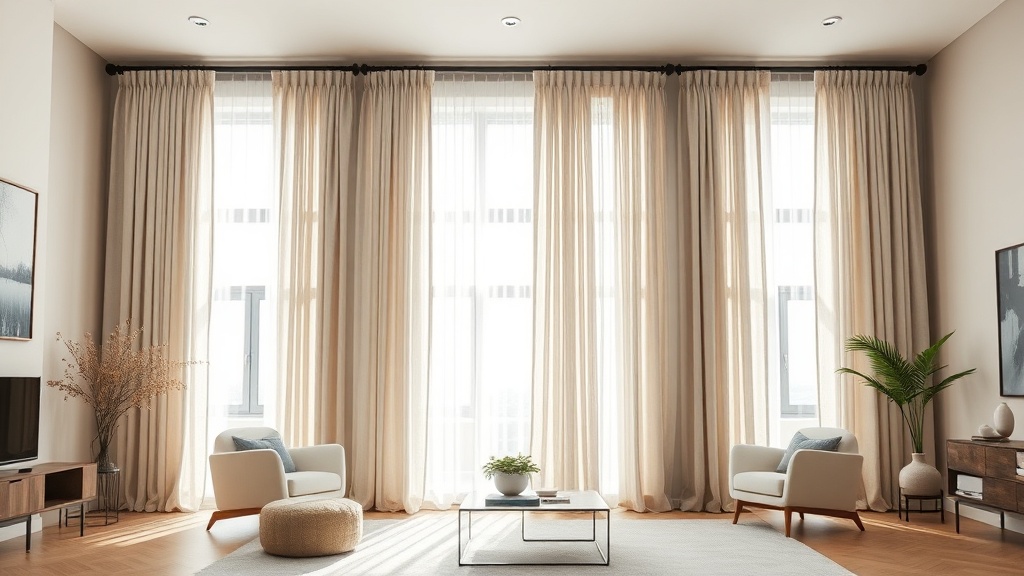
Your curtains aren't ugly because of the fabric. They're ugly because of the math you skipped.
I need to say something that the "just hang them high and wide!" crowd on Instagram doesn't want to hear: that advice is incomplete to the point of being dangerous. Yes, mounting your rod higher than the window frame is step one. But it is literally just step one. There are at least four measurements that determine whether your curtains look intentional or like you hung bedsheets from a tension rod at a college dorm party. And I'm going to walk you through all of them with actual numbers.
Measurement 1: Rod Height — The Ceiling Relationship
The "rule" you've heard is 4-6 inches above the window frame. Fine. But here's what that rule doesn't account for: ceiling height changes the equation entirely.
In a standard 8-foot ceiling room, 4-6 inches above the frame usually works because it splits the difference between frame and ceiling in a visually balanced way. But in a 9- or 10-foot ceiling? Six inches above a window frame that's already 18 inches below the ceiling creates a dead zone of wall that makes the room look like it's wearing pants that are too short.
My actual rule:
- 8-foot ceilings: Mount 4-6 inches above the frame, or at the crown molding line if you have it.
- 9-foot ceilings: Go to the ceiling. Seriously. Leave 1-2 inches of clearance max. The visual lift is worth it.
- 10-foot+ ceilings: Ceiling mount or 2 inches below. No exceptions. The taller the wall, the more the curtain needs to claim that full vertical.
And for the love of spatial logic: if you have crown molding, the rod goes below the molding, not through it, not above it, not "wherever." The molding is a visual terminus. Respect the architecture.
Measurement 2: Rod Width — The Stackback Calculation
This is where most people get burned. You buy curtains the width of your window. You hang them. And now when they're open, the fabric covers 6-8 inches of glass on each side, blocking light and making your window look 30% smaller than it is.
The fix is called stackback — the space the curtain panels occupy when fully open. And it depends on your fabric weight:
- Sheer/lightweight fabric: Each panel stacks to about 6-8 inches.
- Medium-weight linen or cotton: 8-12 inches per panel.
- Heavy velvet or lined drapery: 12-16 inches per panel.
Your rod should extend beyond the window frame by at least the stackback width on each side. For a 48-inch window with medium-weight panels: 48 + 10 + 10 = 68-inch rod minimum. This means your open curtains frame the glass instead of eating it.
I cannot tell you how many "why does my room feel dark?" consultations I've done where the answer was: your curtains are covering 25% of your window glass when they're open. That's not a lighting problem. That's an arithmetic problem.
Measurement 3: Fullness Ratio — The Flat Curtain Epidemic
Fullness ratio is how much wider the total curtain fabric is compared to the rod width. And this is where budget shopping creates the most visible damage.
Here's the scale:
- 1.5x fullness: Minimal. Looks modern and clean on a ripple-fold or grommet heading. Fine for sheers layered behind a heavier panel.
- 2x fullness: The standard for pinch-pleat or goblet headings. This is what most professional installations target. Your 68-inch rod needs 136 inches of total fabric width across both panels.
- 2.5-3x fullness: Luxurious, traditional. Think formal dining rooms, velvet in a library. Gorgeous, but costs accordingly.
- 1x fullness: This is a flat panel. It is not a curtain. It is a wall flag. I will not pretend otherwise.
The reason so many Amazon and big-box curtain panels look limp and sad: they're sold as "fits windows 42-54 inches" with a 54-inch fabric width per panel. Two panels = 108 inches of fabric on a, say, 50-inch rod. That's barely 2x. And once you account for the rod extending beyond the frame for stackback, you're under 1.5x. You've bought a flat panel and you didn't even know it.
The fix: Measure your rod length (including the extensions beyond the frame). Multiply by your target fullness ratio. Divide by the number of panels. That's how wide each panel actually needs to be. If the panel you're eyeing doesn't hit that number, keep scrolling.
Measurement 4: The Return — Why Your Curtains Look Like They're Floating
This is the one almost nobody talks about outside of the trade, and it drives me genuinely crazy.
A return is where the curtain wraps from the front of the rod back to the wall. Without it, you can see the raw edge of the curtain panel from the side, light leaks in at the bracket, and the whole installation looks like it was hung by someone who's never seen a finished window in a completed home.
For a standard projection bracket (3.5 inches from wall to rod center), your curtain panel needs a return of at least 3.5 inches on the outer edge. This means the panel wraps around the bracket and touches the wall. It creates a finished, sealed look that blocks side light and eliminates the "floating curtain" effect.
Most ready-made panels don't have returns. They just end. If you're buying off the shelf, you can fake it by extending the rod 2-3 inches past the bracket on each end and letting the outermost ring or hook sit at the bracket point, so fabric wraps past. It's not a true return, but it's better than the alternative.
If you're ordering custom, always specify the return depth to match your bracket projection. Any workroom that doesn't ask you for this measurement isn't one I'd trust with my fabric.
Length: The Three Legal Options
I'm going to make this simple because people overthink it:
- Floor kiss: Panels just touch the floor with zero break. Clean, modern, works everywhere. This is my default recommendation for 90% of situations.
- Puddle: 2-6 inches of fabric pooling on the floor. Beautiful in formal rooms with low foot traffic. Terrible if you have kids, dogs, or a Roomba.
- Hovering: Panels ending 1-2 inches above the floor because you measured wrong or were scared of puddling. This is not a style. This is an error. It looks like your curtains shrank in the wash.
There is no universe in which curtains that stop at the window sill or float 4 inches above the floor look intentional on a full-length panel. Café curtains get a pass because they're a different species entirely — they're window-mounted, short by design, and belong in kitchens and bathrooms. Everywhere else: floor.
The Budget Hack That Actually Works
Here's my honest sourcing take: you can absolutely get good curtains under $80 per panel. But you have to know your measurements first and shop to the numbers, not the aesthetic. A $35 IKEA DYTÅG linen panel in the right width and length, properly hung with correct stackback and fullness, will look a thousand times better than a $200 velvet panel that's too narrow, mounted too low, and hovering above the floor.
The fabric is maybe 30% of the equation. The math is the other 70.
So before you spend another dime on panels: measure your ceiling height, measure your window frame, calculate your stackback, check your fullness ratio, and figure out your bracket projection. Write those five numbers down. They are the difference between curtains and window dressing.