Reviving Your Vintage Furniture with Non-Toxic Chalk Paint

The average household contains approximately 30 to 50 pounds of volatile organic compounds (VOCs) lingering in the air, largely emitted from conventional paints and finishes used during home renovations. While the "shabby chic" aesthetic has dominated DIY circles for a decade, the chemical profile of many traditional spray paints and high-gloss lacquers can compromise indoor air quality. Transitioning to non-toxic chalk paint isn't just a stylistic choice; it is a structural decision to improve the health of your living environment while preserving the architectural integrity of vintage pieces.
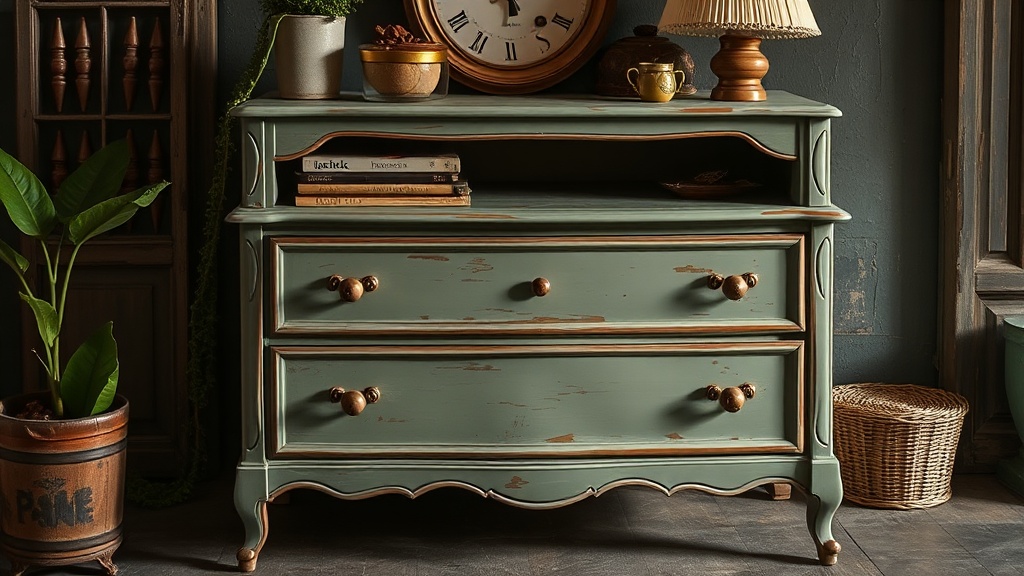
The Anatomy of Chalk Paint: Why It Works
Chalk paint is a highly pigmented, water-based paint that dries to a matte, velvety finish. Unlike traditional latex paints that rely on a heavy resin binder to adhere to surfaces, chalk paint utilizes a high concentration of calcium carbonate. This mineral composition allows it to "grip" onto various textures—from smooth mahogany to distressed pine—without the aggressive sanding required by standard acrylics. From a design perspective, this creates a soft, light-diffusing surface that avoids the harsh glare of high-gloss finishes, making it an ideal tool for creating depth in a room.
When selecting a brand, look for products that are zero-VOC or low-VOC. Brands like Annie Sloan or Rust-Oleum Chalked have set industry standards, but for those seeking a truly professional-grade, non-toxic option, Milk Paint (specifically the traditional lime-based varieties) offers an even more authentic, historical finish. The key is understanding that the matte texture of chalk paint absorbs light rather than reflecting it, which can help soften the visual impact of a heavy piece of furniture in a smaller room.
Phase 1: Surface Preparation and De-greasing
The most common failure in furniture upcycling is improper surface preparation. If you apply paint over a layer of wax, oil, or even skin oils, the calcium carbonate will fail to bond, leading to flaking or "alligatoring" textures. You do not always need to strip the piece down to the raw wood, but you must achieve a chemically clean surface.
- Identify the Substrate: Determine if you are working with solid wood, veneer, or laminate. If it is a high-gloss laminate, you will need to lightly scuff the surface with 220-grit sandpaper to create "tooth" for the paint.
- The Degreasing Step: Use a solution of warm water and a mild, non-toxic dish soap, or a dedicated cleaner like TSP (Trisodium Phosphate) if the piece has significant grime. Avoid harsh chemical strippers if your goal is to maintain a non-toxic home environment.
- Dry Thoroughly: Use a lint-free microfiber cloth to ensure no moisture remains in the grain. Any trapped moisture will cause the paint to bubble as it dries.
Phase 2: The Application Process
Precision in application separates a professional-looking piece from a DIY project that looks amateurish. To achieve a smooth, even coat, you must control both your tool and your movement.
Selecting Your Tools
Avoid cheap, polyester brushes that shed bristles into your wet paint. Instead, opt for a high-quality synthetic bristle brush or a high-density foam roller. For large, flat surfaces like a dresser top, a foam roller provides a seamless finish, whereas a brush is necessary for detailed carvings or ornate legs. If you want a more "painterly" texture, a natural bristle brush can leave subtle, intentional brushstrokes that add character.
The Layering Technique
Chalk paint is applied in thin, even layers. A common mistake is applying a thick coat to try and achieve full opacity in one go. This results in a heavy, "clumpy" texture that lacks the sophisticated matte finish intended.
- First Coat: Apply the paint in long, sweeping motions. Do not overwork the paint; once it hits the surface, leave it alone. Over-brushing causes the paint to lift and creates uneven drying.
- Drying Time: Allow at least 2 to 4 hours between coats. In humid environments, such as a basement or a damp workshop, increase this time.
- Second Coat: The second coat should provide the majority of your color saturation. If you notice "holidays" (small gaps in coverage), do not try to fix them while wet. Wait for the layer to dry completely before applying a targeted touch-up.
Phase 3: Sealing for Durability
Because chalk paint is porous, it remains vulnerable to moisture and stains once the drying process is complete. To make a piece functional—such as a coffee table or a dining chair—you must seal it with a protective topcoat. This is where the "non-toxic" aspect requires the most scrutiny.
Traditional polyurethane can emit strong fumes for weeks. To maintain a healthy indoor environment, choose one of the following professional-grade alternatives:
1. Matte Furniture Wax: This is the classic pairing for chalk paint. A clear or tinted wax (such as Annie Sloan Clear Wax) fills the microscopic pores of the paint. It provides a soft, satin sheen and is excellent for decorative pieces. However, wax is not highly resistant to heat or heavy water contact, so it is not recommended for high-use kitchen surfaces.
3. Natural Beeswax: For a truly organic finish, a high-quality beeswax can be buffed into the surface. This creates a beautiful, tactile finish that smells pleasant and is entirely safe for use in bedrooms or nurseries. To integrate this into a larger design scheme, consider creating a cozy bedroom retreat where natural textures and non-toxic finishes enhance the sense of calm.
Troubleshooting Common Issues
Even with precise execution, architectural elements of the furniture can present challenges. Here is how to solve the most frequent design puzzles encountered during the process:
"The goal of furniture refinishing is not to hide the history of the piece, but to reinterpret it for a modern context. If a mistake occurs, it is rarely a permanent failure; it is simply an opportunity for a new layer."
Problem: The paint is "cracking" or "peeling."
Cause: This is usually due to insufficient drying time between coats or applying paint over a surface that was not properly degreased.
Solution: Lightly sand the affected area with 320-grit sandpaper until smooth, wipe away dust, and reapply a thin layer of paint.
Problem: The finish looks "chalky" or "dusty" even after sealing.
Cause: You may have used a topcoat that is too thin, or the paint was not fully cured.
Solution: Ensure you are using a high-quality wax or polycrylic. If using wax, buff it more vigorously with a lint-free cloth to generate heat, which helps the wax penetrate the paint.
Problem: Visible brush marks on a flat surface.
Cause: Using a brush that is too small or applying the paint too heavily.
Solution: For future projects, use a high-density foam roller for large flat areas. For current projects, wait for the paint to dry, sand it flat with fine-grit sandpaper, and apply a very thin, watered-down "glaze" of the same color to even out the texture.
The Final Aesthetic Integration
Once your piece is finished, consider how it interacts with the rest of your space. A matte, chalk-painted sideboard in a deep navy or sage green can serve as a grounding element in a room with high-gloss floors or metallic accents. Because the finish is non-reflective, it won't compete with your lighting, making it a perfect companion for a room that utilizes layered lighting for cozy rooms.
By choosing non-toxic materials and following a structured, architectural approach to preparation and application, you are doing more than just "painting old furniture." You are practicing sustainable design—extending the lifecycle of a quality object while ensuring your home remains a healthy, breathable sanctuary.
Steps
- 1
Prep and Clean the Surface
- 2
Light Sanding for Grip
- 3
Applying the First Coat
- 4
Layering and Detailing
- 5
Sealing for Durability